
Page 74 - JSOM Winter 2024
P. 74
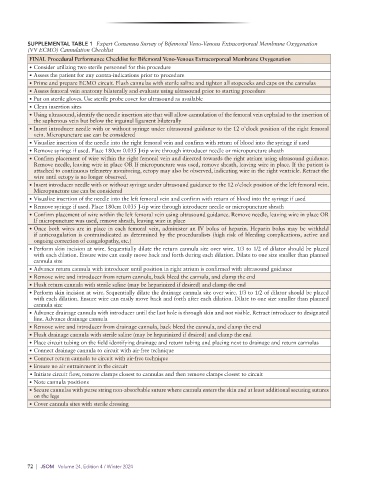
SUPPLEMENTAL TABLE 1  Expert Consensus Survey of Bifemoral Veno-Venous Extracorporeal Membrane Oxygenation
          (VV ECMO) Cannulation Checklist
           FINAL Procedural Performance Checklist for Bifemoral Veno-Venous Extracorporeal Membrane Oxygenation
           • Consider utilizing two sterile personnel for this procedure
           • Assess the patient for any contra-indications prior to procedure
           • Prime and prepare ECMO circuit. Flush cannulas with sterile saline and tighten all stopcocks and caps on the cannulas
           • Assess femoral vein anatomy bilaterally and evaluate using ultrasound prior to starting procedure
           • Put on sterile gloves. Use sterile probe cover for ultrasound as available
           • Clean insertion sites
           • Using ultrasound, identify the needle insertion site that will allow cannulation of the femoral vein cephalad to the insertion of
            the saphenous vein but below the inguinal ligament bilaterally
           • Insert introducer needle with or without syringe under ultrasound guidance to the 12 o’clock position of the right femoral
            vein. Micropuncture use can be considered
           • Visualize insertion of the needle into the right femoral vein and confirm with return of blood into the syringe if used
           • Remove syringe if used. Place 180cm 0.035 J-tip wire through introducer needle or micropuncture sheath
           • Confirm placement of wire within the right femoral vein and directed towards the right atrium using ultrasound guidance.
            Remove needle, leaving wire in place OR If micropuncture was used, remove sheath, leaving wire in place. If the patient is
            attached to continuous telemetry monitoring, ectopy may also be observed, indicating wire in the right ventricle. Retract the
            wire until ectopy is no longer observed.
           • Insert introducer needle with or without syringe under ultrasound guidance to the 12 o’clock position of the left femoral vein.
            Micropuncture use can be considered
           • Visualize insertion of the needle into the left femoral vein and confirm with return of blood into the syringe if used
           • Remove syringe if used. Place 180cm 0.035 J-tip wire through introducer needle or micropuncture sheath
           • Confirm placement of wire within the left femoral vein using ultrasound guidance. Remove needle, leaving wire in place OR
            If micropuncture was used, remove sheath, leaving wire in place
           • Once both wires are in place in each femoral vein, administer an IV bolus of heparin. Heparin bolus may be withheld
            if anticoagulation is contraindicated as determined by the proceduralists (high risk of bleeding complications, active and
            ongoing correction of coagulopathy, etc.)
           • Perform skin incision at wire. Sequentially dilate the return cannula site over wire. 1/3 to 1/2 of dilator should be placed
            with each dilation. Ensure wire can easily move back and forth during each dilation. Dilate to one size smaller than planned
            cannula size
           • Advance return cannula with introducer until position in right atrium is confirmed with ultrasound guidance
           • Remove wire and introducer from return cannula, back bleed the cannula, and clamp the end
           • Flush return cannula with sterile saline (may be heparinized if desired) and clamp the end
           • Perform skin incision at wire. Sequentially dilate the drainage cannula site over wire. 1/3 to 1/2 of dilator should be placed
            with each dilation. Ensure wire can easily move back and forth after each dilation. Dilate to one size smaller than planned
            cannula size
           • Advance drainage cannula with introducer until the last hole is through skin and not visible. Retract introducer to designated
            line. Advance drainage cannula
           • Remove wire and introducer from drainage cannula, back bleed the cannula, and clamp the end
           • Flush drainage cannula with sterile saline (may be heparinized if desired) and clamp the end
           • Place circuit tubing on the field identifying drainage and return tubing and placing next to drainage and return cannulas
           • Connect drainage cannula to circuit with air-free technique
           • Connect return cannula to circuit with air-free technique
           • Ensure no air entrainment in the circuit
           • Initiate circuit flow, remove clamps closest to cannulas and then remove clamps closest to circuit
           • Note cannula positions
           • Secure cannulas with purse string non-absorbable suture where cannula enters the skin and at least additional securing sutures
            on the legs
           • Cover cannula sites with sterile dressing


          72  |  JSOM   Volume 24, Edition 4 / Winter 2024