
Page 91 - 2022 Spring JSOM
P. 91
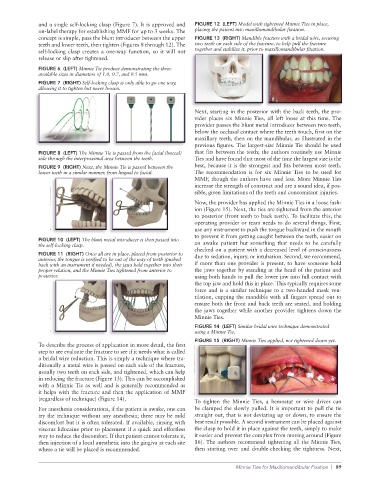
and a single self-locking clasp (Figure 7). It is approved and   FIGURE 12  (LEFT) Model with tightened Minnie Ties in place,
              on-label therapy for establishing MMF for up to 3 weeks. The   placing the patient into maxillomandibular fixation.
              concept is simple, pass the blunt introducer between the upper   FIGURE 13  (RIGHT) Mandible fracture with a bridal wire, securing
              teeth and lower teeth, then tighten (Figures 8 through 12). The   two teeth on each side of the fracture, to help pull the fracture
              self-locking clasp creates a one-way function, so it will not   together and stabilize it, prior to maxillomandibular fixation.
              release or slip after tightened.
              FIGURE 6  (LEFT) Minnie Tie product demonstrating the three
              available sizes in diameters of 1.0, 0.7, and 0.5 mm.
              FIGURE 7  (RIGHT) Self-locking clasp is only able to go one way,
              allowing it to tighten but never loosen.


                                                                 Next, starting in the posterior with the back teeth, the pro-
                                                                 vider places six Minnie Ties, all left loose at this time. The
                                                                 provider passes the blunt metal introducer between two teeth,
                                                                 below the occlusal contact where the teeth touch, first on the
                                                                 maxillary teeth, then on the mandibular, as illustrated in the
                                                                 previous figures. The largest-size Minnie Tie should be used
              FIGURE 8  (LEFT) The Minnie Tie is passed from the facial (buccal)   that fits between the teeth; the authors routinely use Minnie
              side through the interproximal area between the teeth.  Ties and have found that most of the time the largest size is the
              FIGURE 9  (RIGHT) Next, the Minnie Tie is passed between the   best, because it is the strongest and fits between most teeth.
              lower teeth in a similar manner, from lingual to facial.  The recommendation is for six Minnie Ties to be used for
                                                                 MMF, though the authors have used less. More Minnie Ties
                                                                 increase the strength of construct and are a sound idea, if pos-
                                                                 sible, given limitations of the teeth and concomitant injuries.

                                                                 Now, the provider has applied the Minnie Ties in a loose fash-
                                                                 ion (Figure 15). Next, the ties are tightened from the anterior
                                                                 to posterior (front teeth to back teeth). To facilitate this, the
                                                                 operating provider or team needs to do several things. First,
                                                                 use any instrument to push the tongue backward in the mouth
                                                                 to prevent it from getting caught between the teeth, easier on
              FIGURE 10  (LEFT) The blunt metal introducer is then passed into
              the self-locking clasp.                            an awake patient but something that needs to be carefully
                                                                 checked on a patient with a decreased level of consciousness
              FIGURE 11  (RIGHT) Once all are in place, placed from posterior to   due to sedation, injury, or intubation. Second, we recommend,
              anterior, the tongue is verified to be out of the way of teeth (pushed
              back with an instrument if needed), the jaws held together into their   if more than one provider is present, to have someone hold
              proper relation, and the Minnie Ties tightened from anterior to   the jaws together by standing at the head of the patient and
              posterior.                                         using both hands to pull the lower jaw into full contact with
                                                                 the top jaw and hold this in place. This typically requires some
                                                                 force and is a similar technique to a two-handed mask ven-
                                                                 tilation, cupping the mandible with all fingers spread out to
                                                                 ensure both the front and back teeth are seated, and holding
                                                                 the jaws together while another provider tightens down the
                                                                 Minnie Ties.
                                                                 FIGURE 14  (LEFT) Similar bridal wire technique demonstrated
                                                                 using a Minnie Tie.
                                                                 FIGURE 15  (RIGHT) Minnie Ties applied, not tightened down yet.
              To describe the process of application in more detail, the first
              step to see evaluate the fracture to see if it needs what is called
              a bridal wire reduction. This is simply a technique where tra-
              ditionally a metal wire is passed on each side of the fracture,
              usually two teeth on each side, and tightened, which can help
              in reducing the fracture (Figure 13). This can be accomplished
              with a Minnie Tie as well and is generally recommended as
              it helps with the fracture and then the application of MMF
              (regardless of technique) (Figure 14).
                                                                 To tighten the Minnie Ties, a hemostat or wire driver can
              For anesthesia considerations, if the patient is awake, one can   be clamped the slowly pulled. It is important to pull the tie
              try the technique without any anesthesia; there may be mild   straight out, that is not deviating up or down, to ensure the
              discomfort but it is often tolerated. If available, rinsing with   best result possible. A second instrument can be placed against
              viscous lidocaine prior to placement if a quick and effortless   the clasp to hold it in place against the teeth, simply to make
              way to reduce the discomfort. If that patient cannot tolerate it,   it easier and prevent the complex from moving around (Figure
              then injection of a local anesthetic into the gingiva at each site   16). The authors recommend tightening all the Minnie Ties,
              where a tie will be placed is recommended.         then starting over and double-checking the tightness. Next,


                                                                              Minnie Ties for Maxillomandibular Fixation  |  89