
Page 43 - 2020 JSOM Winter
P. 43
tests and collected the data. The patient was brought to the TABLE 1 Cont.
caregiver at an area that was set up for initial emergency treat- Push more with nondominant hand than the dominant hand
ment. The caregiver wore eyeglasses, scrubs, and medical rub- 14 pulls to still the limb on gurney.
ber shoes. Prior to tests, the caregiver wore no PPE, and the Pull the band tightly to pull snug the band portion that is
equipment was shelved. 15 still looped around limb.
Secure the running end of band to its portion still looped
16
Conditions in the PPE1 group included donning a physician’s around limb. Do not cover clips.
coat, safety goggles, a bandana face covering (with two rub- 17 Turn rod to make the tourniquet compress the limb. Turns
ber bands), a fleece cap, a pair of plastic booties, and a pair are to stop the external bleeding.
of food-preparation gloves. Conditions in the PPE2 group in- 18 Finish the final turn of the rod. Secure the rod by putting an
cluded donning a disposable lab coat, a blue surgical mask, a end into a clip.
blue surgical hat, a pair of plastic booties, a face shield, and a 19 Look at the wound for bleeding while feeling behind the
pair of treatment gloves. The face shield was improvised from distal thigh for an artery pulse.
duct tape, a large bandana, and a clear plastic sheet. This ban- 20 Troubleshoot if pulse is felt or bleeding is seen. Troubleshoot
dana was worn like a crown, and the sheet was taped to it to until both are stopped.
hang down. The coats were donned reversed. PPE was reused 21 Put any excess of the running end of the band between the
except gloves. clips.
22 Pull the time strap to bridge from one clip to the other.
Fasten Velcro to lock the rod in.
Although the field tourniquet instructions (http://www
.combattourniquet.com/wp-content) do not address conver- 23 Tape over the strap. Uncap marker. Write the time of day
onto tape. Recap. Drop marker.
sion, it was used accordingly, except in reuse and pulse and Stop manikin to end timing of field tourniquet trial. Lap
bleeding checks performed earlier to speed troubleshooting. 24 stopwatch. Record data of trial.
Tourniquet conversion was from the nonpneumatic windlass Enter manikin scenario for emergency care and start
model to a pneumatic model that was reused among tests 25 manikin for a conversion trial.
(Emergency and Military Tourniquet [EMT]; Delfi Medical Walk to the shelf to find and fetch a pneumatic tourniquet.
Innovations). Although its instructions do not address con- 26 Carry it and walk back to patient.
version, it was used accordingly (http://www.delfimedical.com Open the packaged pneumatic tourniquet and set aside its
/emergency-military-tourniquet/). A marker was used to re- 27 instruction booklet and wrapper.
cord the time of tourniquet application. Unroll the tourniquet. Hold clamp handle to dangle open
28
the loop in the band (bladder).
Tests were divided into halves, referred to as trials. A trial of 29 Pass the loop around the limb to place the pneumatic
field tourniquet use preceded its paired trial of conversion of tourniquet above the field tourniquet.
the field tourniquet to a pneumatic tourniquet. The test step 30 Pull the tape off the field tourniquet, undo its strap, unclip
order included any PPE donning followed by the paired trials rod, and undo the turns in the rod.
(Table 1). Data were collected after the trials. Recording data 31 Peel back red tip of the self-adhering band to unfasten its
between trials mimicked the period in which healthcare work- Velcro until reaching the buckle.
ers tend to their recordkeeping and make a decision to convert. 32 Loosen the loop in the band. Pass loop off the limb to
remove field tourniquet. Set it aside.
Slide the loop in the pneumatic tourniquet to place it 2–3
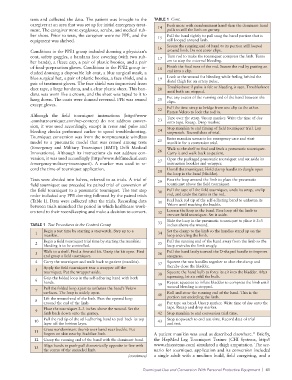
TABLE 1 Test Procedures in the Control Group 33 inches above the wound.
Begin a test time by starting a stopwatch. Step up to a Set the clamp to the limb so the handles stand up on the
1 34
manikin. loop encircling the limb.
2 Begin a field tourniquet trial time by starting the manikin: 35 Pull the running end of the band away from the limb so the
bleeding is to be controlled. loop encircles the limb snugly.
Walk to a shelf. Find a first-aid kit. Unzip the kit open. Find Pull the band lastly toward the D-shaped handle to improve
3 36
and grasp a field tourniquet. snugness.
4 Carry the tourniquet and walk back to patient (manikin). Squeeze the two handles together to shut the clamp and
37
Apply the field tourniquet: tear a wrapper off the thereby close the bladder.
5
tourniquet. Put the wrapper aside. 38 Squeeze the hand bulb to force its air into the bladder. After
Grip the folded loop in the self-adhering band with both squeezing, let air refill the bulb.
6
hands. 39 Repeat squeezes to inflate bladder to compress the limb until
Pull the folded loop apart to unfasten the band’s Velcro wound bleeding is stopped.
7
surfaces. The loop is widely open. 40 Roll and stow the running end of the band. This is the
Lift the wound-end of the limb. Pass the opened loop portion not encircling the limb.
8
around the end of the limb. 41 Put tape on band. Uncap marker. Write time of day onto the
Place the tourniquet 2–3 inches above the wound. Set the tape. Recap and drop marker.
9
limb back down onto the gurney. 42 Stop manikin to end conversion trial time.
Pull the red tip of the self-adhering band to peel back its top Stop stopwatch to end test time. Record data of trial
10 43
layer off the bottom layer. and test.
Cross nondominant thumb over band near buckle. Put
11
fingers on skin nearby. Stabilize limb. A patient manikin was used as described elsewhere. Briefly,
11
12 Grasp the running end of the band with the dominant hand. the HapMed Leg Tourniquet Trainer (CHI Systems, http://
Align hands to push-pull diametrically opposite in-line with www.chisystems.com) simulated a thigh amputation. The sce-
13
the center of the encircled limb. nario for tourniquet application and its conversion included
(continues) a single adult with a medium build, field caregiving, and a
Tourniquet Use and Conversion With Personal Protective Equipment | 41