
Page 48 - JSOM Fall 2020
P. 48
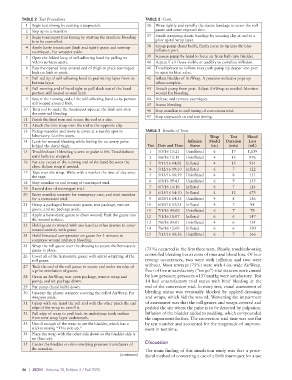
TABLE 2  Test Procedures                           TABLE 2  Cont.
            1  Begin test timing by starting a stopwatch.     36  Wrap tightly and spirally the elastic bandage to cover the roll
            2  Step up to a manikin.                             gauze and some exposed skin.
            3  Begin tourniquet trial timing by starting the manikin: bleeding   37  Finish wrapping elastic bandage by securing clip at end to a
              is to be controlled.                               prior spiral wrap layer.
            4  Apply hasty tourniquet (high and tight): grasp and unwrap   38  Grasp pump (hand bulb), firmly press its tip into the blue
              tourniquet. Put wrapper aside.                     inflation port.
            5  Open the folded loop of self-adhering band by pulling its   39  Squeeze pump by hand to force air from bulb into bladder.
              Velcro surfaces apart.                          40  Repeat if air flows visibly or audibly to complete inflation.
            6  Pass the opened loop around end of thigh to place tourniquet   41  Troubleshoot no inflow: may push pump tip deeper into port
              high on limb at groin.                             to open its blue valve.
            7  Pull red tip of self-adhering band to peel its top layer from its   42  Inflate bladder of AirWrap. A pressure indicator pops up
              bottom layer.                                      when complete.
            8  Pull running end of band tight to pull slack out of the band   43  Detach pump from port. Adjust AirWrap as needed. Monitor
              portion still looped around limb.                  wound for bleeding.
            9  Secure the running end of the self-adhering band to its portion   44  Release and remove tourniquet.
              still looped around limb.                       45  Assess bleeding.
           10  Turn rod to make the tourniquet squeeze the limb and stop   46  Stop manikin to end timing of conversion trial.
              the external bleeding.
           11  Finish the final turn and secure the rod in a clip.   47  Stop stopwatch to end test timing.
           12  Attach the time strap over the rod to the opposite clip.
           13  Pickup manikin and move to cover at a nearby spot in   TABLE 3  Results of Tests
              laboratory. Gunfire stops.                                                Wrap    Test   Blood
           14  Look for wound bleeding while feeling for an artery pulse       Inflation   Model   Duration   Loss
              behind the distal thigh.                        Test Date and Time  Status  (in.)  (min)  (mL)
           15  Troubleshoot if bleeding is seen or pulse is felt. Troubleshoot   1  5/5/16 15:21  Uninflated  6  17  1,139
              until both are stopped.                          2  5/6/16 12:18  Uninflated  4    16     976
           16  Put any excess of the running end of the band between the   3  5/11/16 14:02  Inflated  4  13  931
              clips. Adjust strap if needed.
                                                               4  5/12/16 09:10  Inflated  6     7      122
           17  Tape over the strap. Write with a marker the time of day onto
              the tape.                                        5  5/13/16 10:39  Uninflated  4   8      151
           18  Stop manikin to end timing of tourniquet trial.   6  6/3/16 09:45  Uninflated  6  9      155
           19  Record data of tourniquet trial.                7  6/7/16 14:10  Inflated  6      7      114
           20  Enter manikin scenario for emergency care, and start manikin   8  6/13/16 14:10  Inflated  4  12  473
              for a conversion trial.                          9  6/29/16 14:35  Uninflated  4   8      136
           21  Grasp a packaged hemostatic gauze, tear package, remove   10  6/30/16 13:35  Inflated  4  7  98
              gauze, and set package aside.                   11  7/1/16 09:00  Uninflated  6    7      78
           22  Apply a hemostatic gauze to dress wound. Pack the gauze into   12  7/1/16 11:07  Inflated  6  6  147
              the wound surface.
           23  Hold gauze to wound with one hand as other dresses to cover   13  7/6/16 09:01  Uninflated  4  6  134
              wound entirely with gauze.                      14  7/6/16 12:00  Inflated  6      6      190
           24  Hold bimanual compression on gauze for 3 minutes to   15  7/13/16 10:56  Uninflated  6  7  166
              compress wound and stop bleeding.
           25  Wrap the roll gauze over the dressing to secure the hemostatic
              gauze in place.                                (75%) occurred in the first three tests. Plainly, troubleshooting
           26  Cover all of the hemostatic gauze with spiral wrapping of the   controlled bleeding but at costs of time and blood loss. Of four
              roll gauze.                                    rewrap occurrences, two were with inflation and two were
           27  Tuck the end of the roll gauze to secure end under an edge of   without. Most rewraps (75%) were with 4-in.-wide AirWrap.
              a prior revolution of gauze.                   Four of five unsatisfactory (“no go”) trial statuses were caused
           28  Grasp an AirWrap, tear open package, remove wrap and   by low pressure; pressures ≥137mmHg were satisfactory. Test
              pump, and set package down.                    14 had unsatisfactory trial status with brief bleeding at the
           29  Put pump (hand bulb) down.                    end of the conversion trial. In every test, visual assessment of
           30  Unwrap the plastic wrapper covering the rolled AirWrap. Put   bleeding status was eventually blocked by applied dressings
              wrapper aside.                                 and wraps, which hid the wound. Worsening the impairment
           31  Grasp with one hand the roll and with the other pinch the end   of assessment was that the roll gauzes and wraps covered and
              edge of the wrap to unroll it.                 padded the site where the pulse is to be detected by palpation.
           32  Pull edge of wrap to peel back its underlying hook surface   Inflation of the bladder added to padding, which compounded
              from next wrap layer underneath.               the impairment further. The conversion trial time was not flat
           33  Unroll enough of the wrap to see the bladder, which has a   by test number and accounted for the magnitude of improve-
              sticker stating “This side up.”                ment in test time.
           34  Place the wrap with the other side down so the bladder side is
              up (face up).
           35  Center the bladder on skin overlying pressure transducers of   Discussion
              the manikin.                                   The main finding of this simulation study was that a proce-
                                                  (continues)  dural method of converting a use of a limb tourniquet for a use


          46  |  JSOM   Volume 20, Edition 3 / Fall 2020